 darknet
 coq tactics

YOLO: Real-Time Object Detection
You only look once (YOLO) is a state-of-the-art, real-time object detection system. On a Pascal Titan X it processes images at 30 FPS and has a mAP of 57.9% on COCO test-dev.
Comparison to Other Detectors
YOLOv3 is extremely fast and accurate. In mAP measured at .5 IOU YOLOv3 is on par with Focal Loss but about 4x faster. Moreover, you can easily tradeoff between speed and accuracy simply by changing the size of the model, no retraining required!
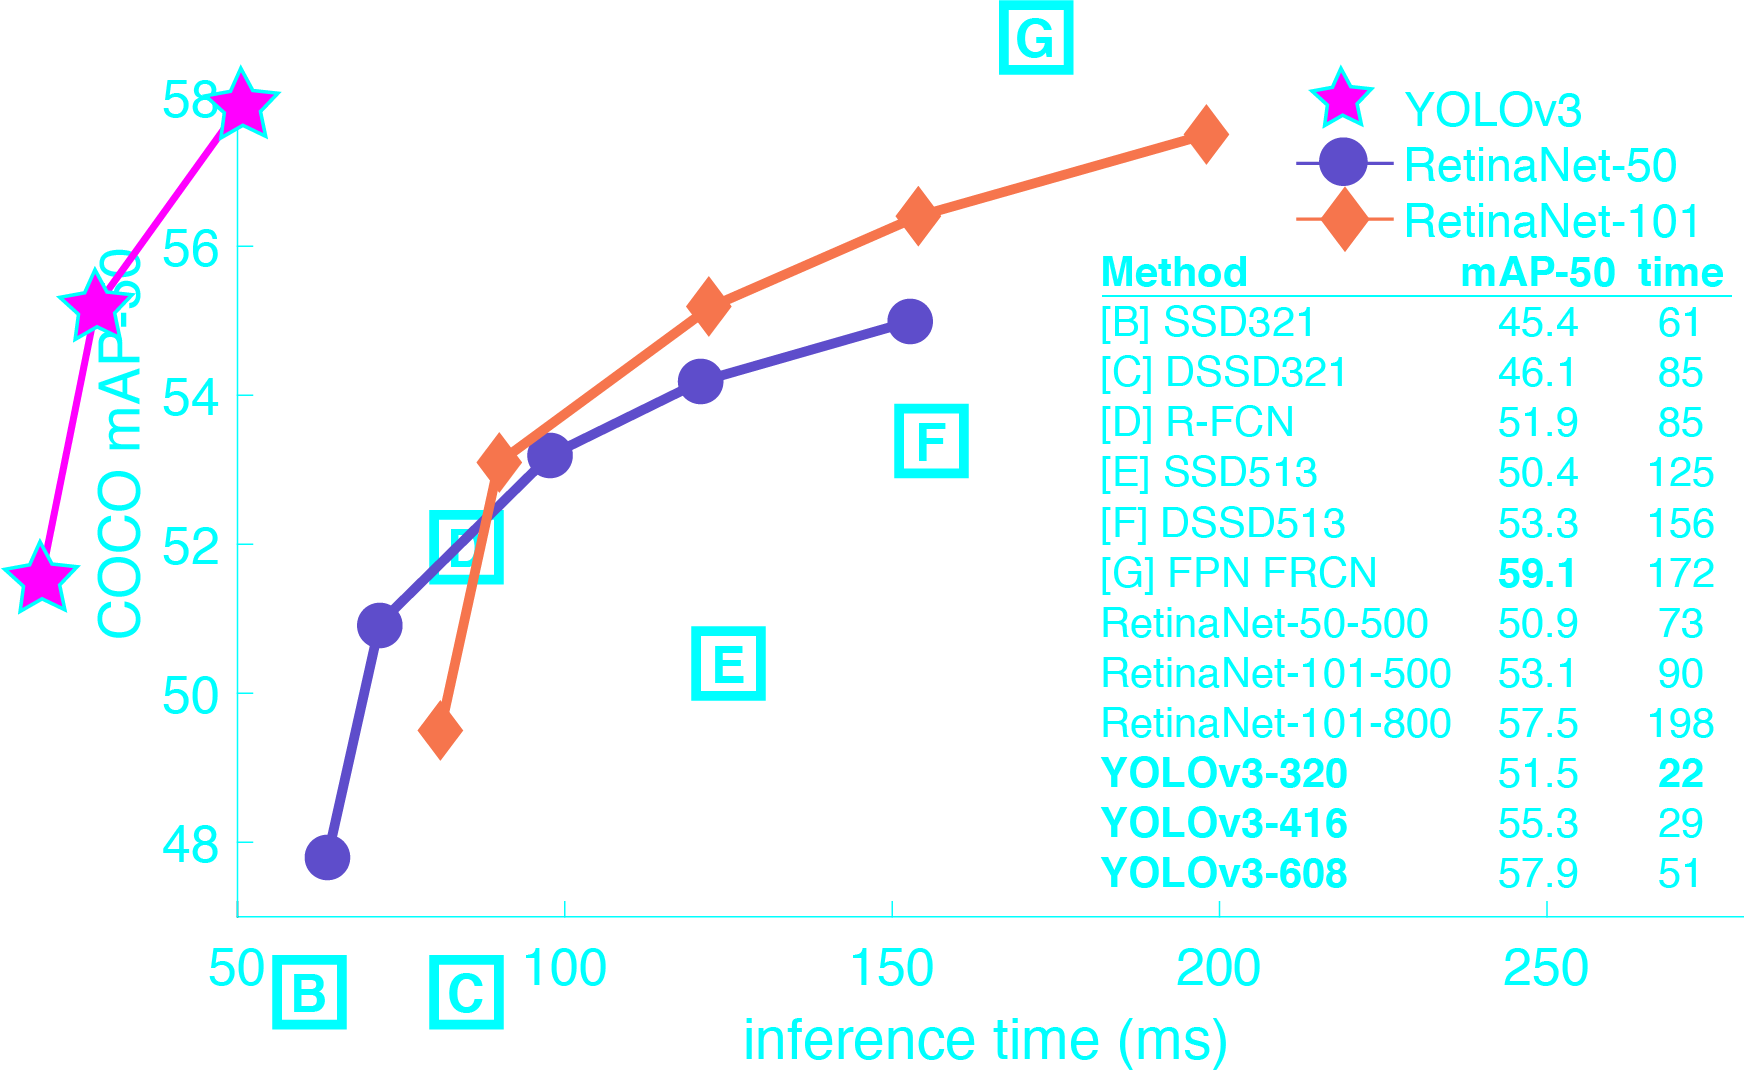
Performance on the COCO Dataset
| Model | Train | Test | mAP | FLOPS | FPS | Cfg | Weights |
|---|---|---|---|---|---|---|---|
| SSD300 | COCO trainval | test-dev | 41.2 | - | 46 | link | |
| SSD500 | COCO trainval | test-dev | 46.5 | - | 19 | link | |
| YOLOv2 608x608 | COCO trainval | test-dev | 48.1 | 62.94 Bn | 40 | cfg | weights |
| Tiny YOLO | COCO trainval | test-dev | 23.7 | 5.41 Bn | 244 | cfg | weights |
| SSD321 | COCO trainval | test-dev | 45.4 | - | 16 | link | |
| DSSD321 | COCO trainval | test-dev | 46.1 | - | 12 | link | |
| R-FCN | COCO trainval | test-dev | 51.9 | - | 12 | link | |
| SSD513 | COCO trainval | test-dev | 50.4 | - | 8 | link | |
| DSSD513 | COCO trainval | test-dev | 53.3 | - | 6 | link | |
| FPN FRCN | COCO trainval | test-dev | 59.1 | - | 6 | link | |
| Retinanet-50-500 | COCO trainval | test-dev | 50.9 | - | 14 | link | |
| Retinanet-101-500 | COCO trainval | test-dev | 53.1 | - | 11 | link | |
| Retinanet-101-800 | COCO trainval | test-dev | 57.5 | - | 5 | link | |
| YOLOv3-320 | COCO trainval | test-dev | 51.5 | 38.97 Bn | 45 | cfg | weights |
| YOLOv3-416 | COCO trainval | test-dev | 55.3 | 65.86 Bn | 35 | cfg | weights |
| YOLOv3-608 | COCO trainval | test-dev | 57.9 | 140.69 Bn | 20 | cfg | weights |
| YOLOv3-tiny | COCO trainval | test-dev | 33.1 | 5.56 Bn | 220 | cfg | weights |
| YOLOv3-spp | COCO trainval | test-dev | 60.6 | 141.45 Bn | 20 | cfg | weights |
How It Works
Prior detection systems repurpose classifiers or localizers to perform detection. They apply the model to an image at multiple locations and scales. High scoring regions of the image are considered detections.
We use a totally different approach. We apply a single neural network to the full image. This network divides the image into regions and predicts bounding boxes and probabilities for each region. These bounding boxes are weighted by the predicted probabilities.

Our model has several advantages over classifier-based systems. It looks at the whole image at test time so its predictions are informed by global context in the image. It also makes predictions with a single network evaluation unlike systems like R-CNN which require thousands for a single image. This makes it extremely fast, more than 1000x faster than R-CNN and 100x faster than Fast R-CNN. See our paper for more details on the full system.
What's New in Version 3?
YOLOv3 uses a few tricks to improve training and increase performance, including: multi-scale predictions, a better backbone classifier, and more. The full details are in our paper!
Detection Using A Pre-Trained Model
This post will guide you through detecting objects with the YOLO system using a pre-trained model. If you don't already have Darknet installed, you should do that first. Or instead of reading all that just run:
git clone https://github.com/pjreddie/darknet
cd darknet
make
Easy!
You already have the config file for YOLO in the cfg/ subdirectory. You will have to download the pre-trained weight file here (237 MB). Or just run this:
wget https://pjreddie.com/media/files/yolov3.weights
Then run the detector!
./darknet detect cfg/yolov3.cfg yolov3.weights data/dog.jpg
You will see some output like this:
layer     filters    size              input                output
    0 conv     32  3 x 3 / 1   416 x 416 x   3   ->   416 x 416 x  32  0.299 BFLOPs
    1 conv     64  3 x 3 / 2   416 x 416 x  32   ->   208 x 208 x  64  1.595 BFLOPs
    .......
  105 conv    255  1 x 1 / 1    52 x  52 x 256   ->    52 x  52 x 255  0.353 BFLOPs
  106 detection
truth_thresh: Using default '1.000000'
Loading weights from yolov3.weights...Done!
data/dog.jpg: Predicted in 0.029329 seconds.
dog: 99%
truck: 93%
bicycle: 99%
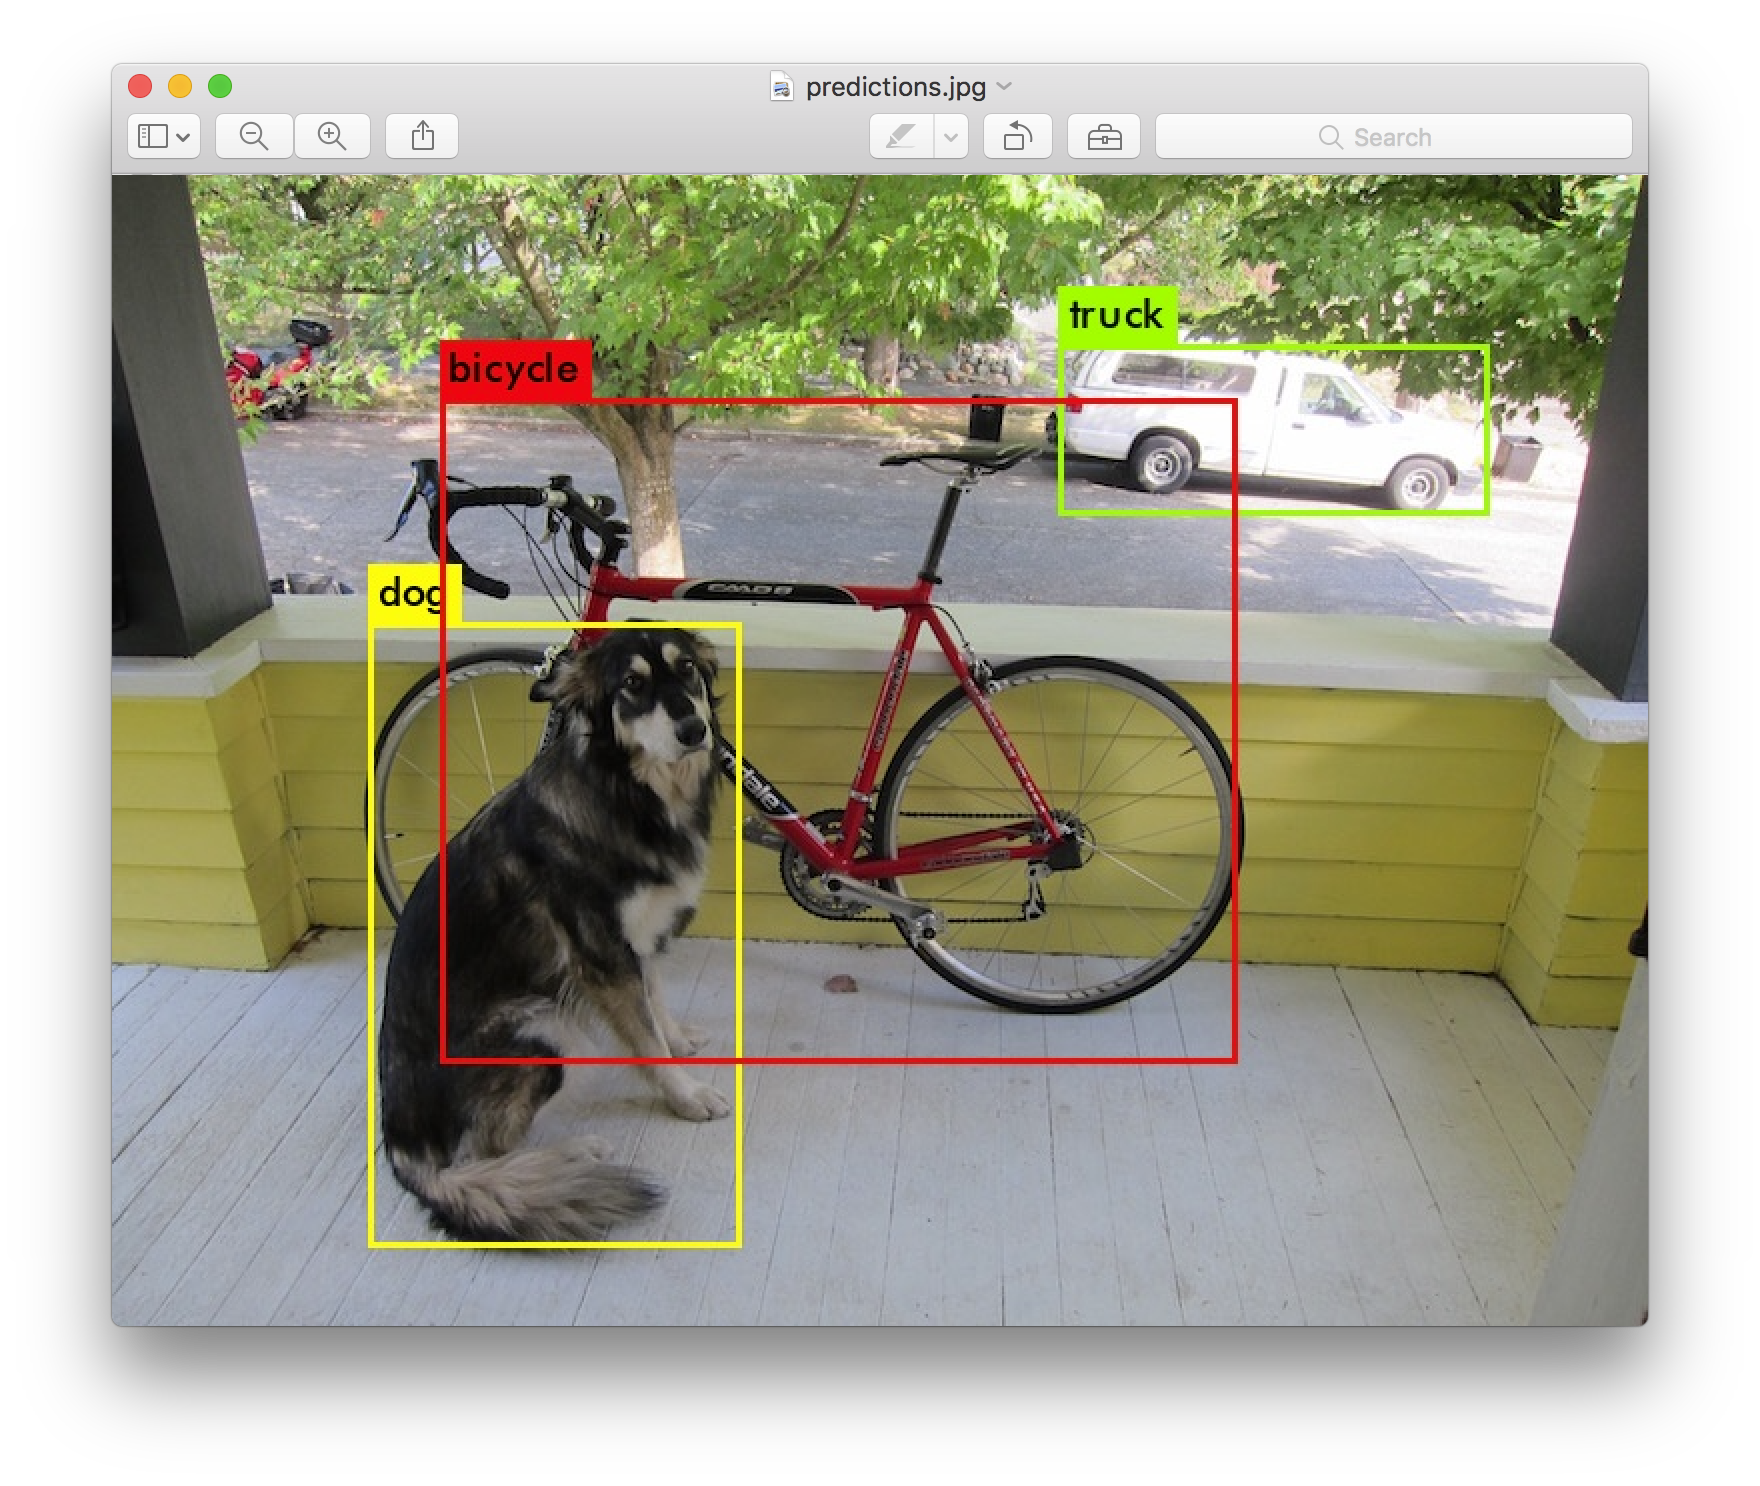
Darknet prints out the objects it detected, its confidence, and how long it took to find them. We didn't compile Darknet with OpenCV so it can't display the detections directly. Instead, it saves them in predictions.png. You can open it to see the detected objects. Since we are using Darknet on the CPU it takes around 6-12 seconds per image. If we use the GPU version it would be much faster.
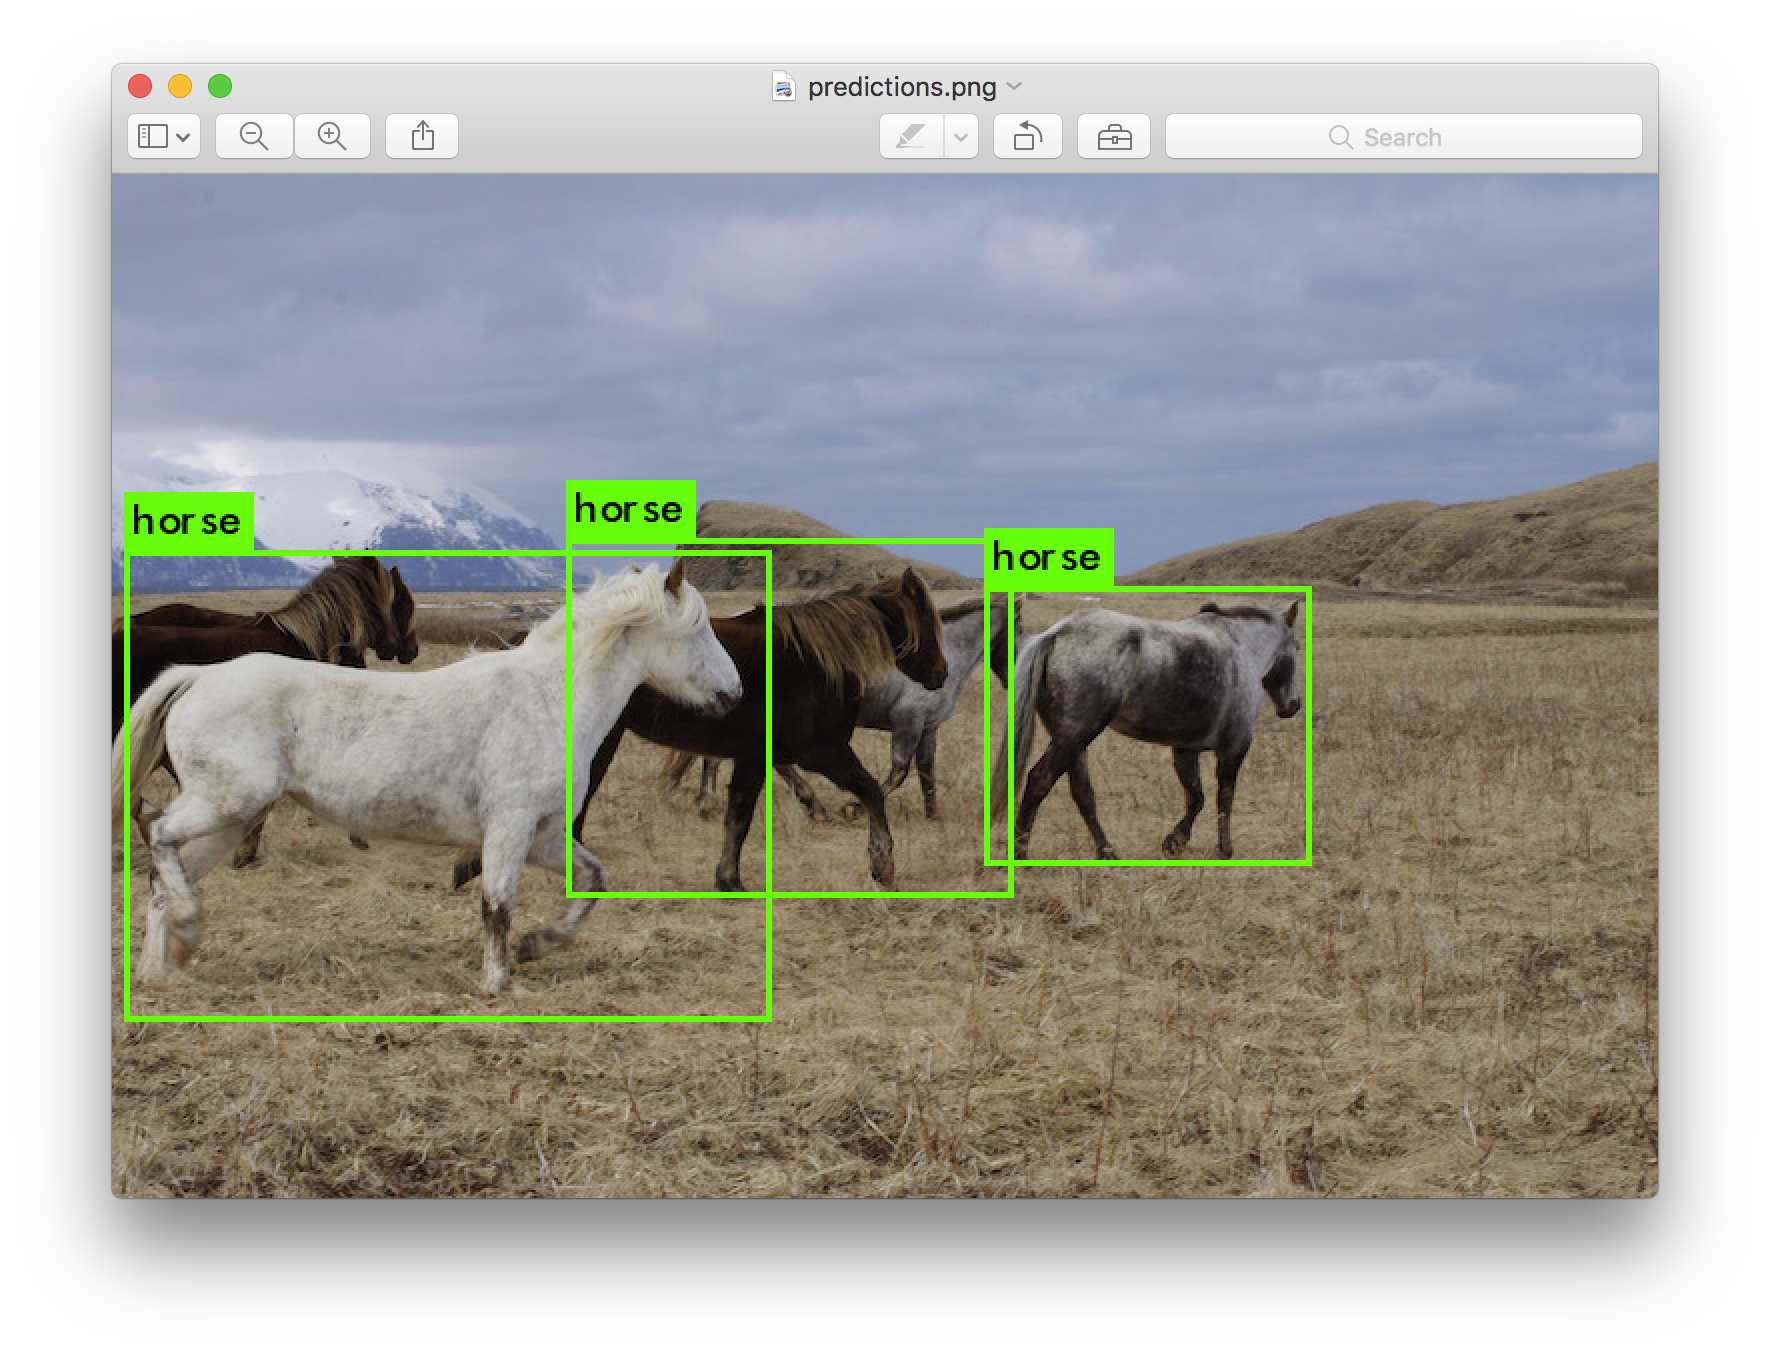
I've included some example images to try in case you need inspiration. Try data/eagle.jpg, data/dog.jpg, data/person.jpg, or data/horses.jpg!
The detect command is shorthand for a more general version of the command. It is equivalent to the command:
./darknet detector test cfg/coco.data cfg/yolov3.cfg yolov3.weights data/dog.jpg
You don't need to know this if all you want to do is run detection on one image but it's useful to know if you want to do other things like run on a webcam (which you will see later on).
Multiple Images
Instead of supplying an image on the command line, you can leave it blank to try multiple images in a row. Instead you will see a prompt when the config and weights are done loading:
./darknet detect cfg/yolov3.cfg yolov3.weights
layer     filters    size              input                output
    0 conv     32  3 x 3 / 1   416 x 416 x   3   ->   416 x 416 x  32  0.299 BFLOPs
    1 conv     64  3 x 3 / 2   416 x 416 x  32   ->   208 x 208 x  64  1.595 BFLOPs
    .......
  104 conv    256  3 x 3 / 1    52 x  52 x 128   ->    52 x  52 x 256  1.595 BFLOPs
  105 conv    255  1 x 1 / 1    52 x  52 x 256   ->    52 x  52 x 255  0.353 BFLOPs
  106 detection
Loading weights from yolov3.weights...Done!
Enter Image Path:
Enter an image path like data/horses.jpg to have it predict boxes for that image.
Once it is done it will prompt you for more paths to try different images. Use Ctrl-C to exit the program once you are done.
Changing The Detection Threshold
By default, YOLO only displays objects detected with a confidence of .25 or higher. You can change this by passing the -thresh <val> flag to the yolo command. For example, to display all detection you can set the threshold to 0:
./darknet detect cfg/yolov3.cfg yolov3.weights data/dog.jpg -thresh 0
Which produces:
![][all]
So that's obviously not super useful but you can set it to different values to control what gets thresholded by the model.
Tiny YOLOv3
We have a very small model as well for constrained environments, yolov3-tiny. To use this model, first download the weights:
wget https://pjreddie.com/media/files/yolov3-tiny.weights
Then run the detector with the tiny config file and weights:
./darknet detect cfg/yolov3-tiny.cfg yolov3-tiny.weights data/dog.jpg
Real-Time Detection on a Webcam
Running YOLO on test data isn't very interesting if you can't see the result. Instead of running it on a bunch of images let's run it on the input from a webcam!
To run this demo you will need to compile Darknet with CUDA and OpenCV. Then run the command:
./darknet detector demo cfg/coco.data cfg/yolov3.cfg yolov3.weights
YOLO will display the current FPS and predicted classes as well as the image with bounding boxes drawn on top of it.
You will need a webcam connected to the computer that OpenCV can connect to or it won't work. If you have multiple webcams connected and want to select which one to use you can pass the flag -c <num> to pick (OpenCV uses webcam 0 by default).
You can also run it on a video file if OpenCV can read the video:
./darknet detector demo cfg/coco.data cfg/yolov3.cfg yolov3.weights <video file>
That's how we made the YouTube video above.
Training YOLO on VOC
You can train YOLO from scratch if you want to play with different training regimes, hyper-parameters, or datasets. Here's how to get it working on the Pascal VOC dataset.
Get The Pascal VOC Data
To train YOLO you will need all of the VOC data from 2007 to 2012. You can find links to the data here. To get all the data, make a directory to store it all and from that directory run:
wget https://pjreddie.com/media/files/VOCtrainval_11-May-2012.tar
wget https://pjreddie.com/media/files/VOCtrainval_06-Nov-2007.tar
wget https://pjreddie.com/media/files/VOCtest_06-Nov-2007.tar
tar xf VOCtrainval_11-May-2012.tar
tar xf VOCtrainval_06-Nov-2007.tar
tar xf VOCtest_06-Nov-2007.tar
There will now be a VOCdevkit/ subdirectory with all the VOC training data in it.
Generate Labels for VOC
Now we need to generate the label files that Darknet uses. Darknet wants a .txt file for each image with a line for each ground truth object in the image that looks like:
<object-class> <x> <y> <width> <height>
Where x, y, width, and height are relative to the image's width and height. To generate these file we will run the voc_label.py script in Darknet's scripts/ directory. Let's just download it again because we are lazy.
wget https://pjreddie.com/media/files/voc_label.py
python voc_label.py
After a few minutes, this script will generate all of the requisite files. Mostly it generates a lot of label files in VOCdevkit/VOC2007/labels/ and VOCdevkit/VOC2012/labels/. In your directory you should see:
ls
2007_test.txt   VOCdevkit
2007_train.txt  voc_label.py
2007_val.txt    VOCtest_06-Nov-2007.tar
2012_train.txt  VOCtrainval_06-Nov-2007.tar
2012_val.txt    VOCtrainval_11-May-2012.tar
The text files like 2007_train.txt list the image files for that year and image set. Darknet needs one text file with all of the images you want to train on. In this example, let's train with everything except the 2007 test set so that we can test our model. Run:
cat 2007_train.txt 2007_val.txt 2012_*.txt > train.txt
Now we have all the 2007 trainval and the 2012 trainval set in one big list. That's all we have to do for data setup!
Modify Cfg for Pascal Data
Now go to your Darknet directory. We have to change the cfg/voc.data config file to point to your data:
  1 classes= 20
  2 train  = <path-to-voc>/train.txt
  3 valid  = <path-to-voc>2007_test.txt
  4 names = data/voc.names
  5 backup = backup
You should replace <path-to-voc> with the directory where you put the VOC data.
Download Pretrained Convolutional Weights
For training we use convolutional weights that are pre-trained on Imagenet. We use weights from the darknet53 model. You can just download the weights for the convolutional layers here (76 MB).
wget https://pjreddie.com/media/files/darknet53.conv.74
Train The Model
Now we can train! Run the command:
./darknet detector train cfg/voc.data cfg/yolov3-voc.cfg darknet53.conv.74
Training YOLO on COCO
You can train YOLO from scratch if you want to play with different training regimes, hyper-parameters, or datasets. Here's how to get it working on the COCO dataset.
Get The COCO Data
To train YOLO you will need all of the COCO data and labels. The script scripts/get_coco_dataset.sh will do this for you. Figure out where you want to put the COCO data and download it, for example:
cp scripts/get_coco_dataset.sh data
cd data
bash get_coco_dataset.sh
Now you should have all the data and the labels generated for Darknet.
Modify cfg for COCO
Now go to your Darknet directory. We have to change the cfg/coco.data config file to point to your data:
  1 classes= 80
  2 train  = <path-to-coco>/trainvalno5k.txt
  3 valid  = <path-to-coco>/5k.txt
  4 names = data/coco.names
  5 backup = backup
You should replace <path-to-coco> with the directory where you put the COCO data.
You should also modify your model cfg for training instead of testing. cfg/yolo.cfg should look like this:
[net]
# Testing
# batch=1
# subdivisions=1
# Training
batch=64
subdivisions=8
....
Train The Model
Now we can train! Run the command:
./darknet detector train cfg/coco.data cfg/yolov3.cfg darknet53.conv.74
If you want to use multiple gpus run:
./darknet detector train cfg/coco.data cfg/yolov3.cfg darknet53.conv.74 -gpus 0,1,2,3
If you want to stop and restart training from a checkpoint:
./darknet detector train cfg/coco.data cfg/yolov3.cfg backup/yolov3.backup -gpus 0,1,2,3
YOLOv3 on the Open Images dataset
wget https://pjreddie.com/media/files/yolov3-openimages.weights

./darknet detector test cfg/openimages.data cfg/yolov3-openimages.cfg yolov3-openimages.weights
What Happened to the Old YOLO Site?
If you are using YOLO version 2 you can still find the site here: https://pjreddie.com/darknet/yolov2/
Cite
If you use YOLOv3 in your work please cite our paper!
@article{yolov3,
  title={YOLOv3: An Incremental Improvement},
  author={Redmon, Joseph and Farhadi, Ali},
  journal = {arXiv},
  year={2018}
}